Gramophone
workshop
On this page I want to report on my experience with
the restoration of gramophones.
For that, still no experiences with the technology of a gramophone has some
bases
are found here.
Perhaps this page(side) is a suggestion for other gramophone friends,
However, perhaps I also receive suggestions and suggestions.
Sometimes a "new"
grammophone "grows" fom any
parts.
My visitors` book can also serve
for the exchange of experience.
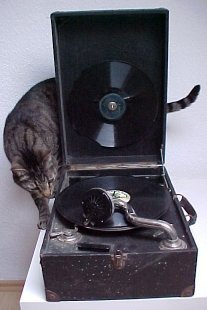
The first
object is a nameless, worm-eaten suitcase gramophone. Now the condition
is pitiably. The sound box rattles, the housing is so worm-eaten
which has stood the stability at some places, rust at a lot of places,
some fittings and screws are absent(lacking) and the relation(connection)
is loose at a lot of places or torn
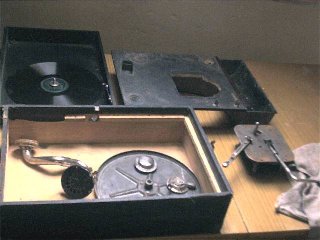
After opening the gramophone
I have emptied out a hand fully wood flour, it was in the work,
in the funnel, in a word everywhere. |
|
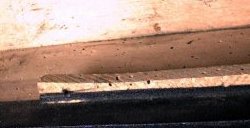
I have started undertaking something against the worm's infestation: after some
searches I have decided to me to kill the worms by heating up. The housing lay
a half an hour with 75 degrees in the oven - no worm endures this! Later some
dead copies have been found in the housing. I have renewed the attachment borders
for the slow-acting plate. I could treat the worm-eaten relation(connection)
- a Lederimitat very well with black shoe polish. The surface(environment) looks
almost as again. Even the worm's holes have become inconspicuous. Loose places
of the relation(connection) I have stuck with latex-bonding agent. Also the
adhesive places could be covered with the shoe polish very well. If the shoe
polish has entered only correctly, the material also does not fade any more.
The sound box has done few problems. Rattling has appeared from game of the
needle storage. The screws can be solved and put. The covered mica membrane
with a damp cloth clean. The elastic band is flexible still astonishingly. The
nickel-plating could be cleaned with a budget cleaning material and a tiny drop
oil on every thread and joint has concluded(closed) the whole. The success is
very good - rattling with the reproduction has disappeared.
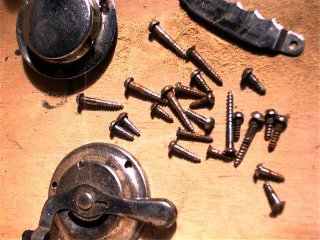
The temporarily biggest problem are the screws. All possible sorts have been
obstructed, but with nibbled, rusty and different heads. Where I can find fitting
wood screws with semicircular head I do not know yet. As well I still have no
idea, where I a fastener for the lid herbekomme.
Rule No 1: every screw should be cleaned! A wire brush is suitable in the best for it. If a wood
screw does not touch any more - take no bigger one, but a few chips of wood
in the hole stick, so that the old screw fits again. An original screw is to
be replaced with Nothing. Even if the chrome - or nickel layer lacks, a droplet
varnish on a shiny steel screw looks to the preserving better than one not fitting,
new screw. But the screwhead should be sealed only after perfect work.
The engine has caused no problems. The wood dust
was removed, the warehouses oiled and the whole again inserted.
However, at the test entreprise rumbling appeared in different distances which
shook the whole device. I already believed, the feather would break!
Remedy could be created by oils of the feather. However, in addition the engine
must be disassembled. This is no big problem, because the feather "is "caught"
in the housing certainly(safely). However, the engine must have run off(expired).
On removing the lid of the spring assembly one could recognize the hardened
fat as a cause. The feather was not able by their(her) friction to relax evenly.
Because I did not want to dismantle the feather, however, I have soaked the
fat with a Rostlöser (Caramba). With the subsequent drawing up of the feather
one could already note a difference. Now the engine runs nearly noiselessly!
However, better it is to develop the feather, to clean correctly and provide
with fresh fur to start again.
Opened spring assembly
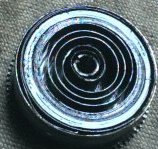 .
.
Time see how it goes on.
In the meantime I have brought the second engine to the running. Also this has
done substantial sounds with the run: regular rattles - this came from deposits
on the take-up motion, rumbling the feather and, finally, pathetic lyres
The cleaning of the take-up motion-approach-disc and fat of the feather brought
an effective success. However, with the fat of the feather is to be paid attention
to the fact that, really, between every bend of the feather fat comes. I have
stretched in addition the opened spring assembly in the wave in a vice - the
open page(side) must point to the vice, so that the feather can not jump out!
Then I have stretched by turning of the housing the feather. (Gloves use not
to hurt itself in the teeth of the housing), besides, approaches mang to every
bend and can press the fat in between. Afterwards relax very carefully the feather
- finishedly!
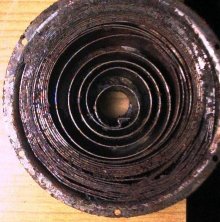
The
next hard nut is this feather of Columbia Nr.50
If one just(exactly)
considers the photo on the right, one already sees that the feather
has broken repeatedly to be silent from the rust completely
After removing the feather it saw so aus:.
Nevertheless I have tried to repair for exercise purposes both longest
ends of the feather. Because, however, plentifully rust existed,
only an exercise could be, really. The fitting with springs must
be riveted. Because the material(equipment) is hardened, it can
not be bored so just like that. To agree with a small propane distiller
(like a sprayer - in the property market for little money) the fitting
with springs on a length of approx. 15-20 mms are heated up to the
dark red heat - for approx. 30 seconds. Afterwards one allows to
cool them(her) slowly. Now the fitting with springs can be bored.
To guarantee that the fitting with springs are really aimed in a
line, I have built with some wooden strips a small device. Both
fitting with springs are put on top of each other, hold it tight,
mark it and afterwards bored. Two holes should be enough. As a rivet
I have usual approx. three millimeters thickens nails with small
head applies - but no steel nails!! They(you) are shortened on in
length of approx. three millimeters. Before still the burr on the
bottom of the head weggefeilt should become, so that this lies better.
Afterwards the feather can be riveted. As an "anvil" I
have stretched a chisel crosswise in the vice to have the necessary
freedom of movement. Now a few hammer-blows on the rivet, also the
feather again turn round and hit the head a little bit more flat
and the thing is done. |
|
. Finally,
I have used the largely derusted and gefettete feather again. First
she is fastened to the spring drum. Do a good part of grease on
the drums bottom. Then the grease comes good between the spring
layers. |
|
|
Hier were
the original-holds-pen had been filed off by accident outwardly
- I believed the feather was rivet. So I took an approx. 20 mms
long M3 from screw with which fastening the feather was very simple.Afterwards
the housing is fixed on the work-bench and the feather is inserted
carefully outwardly inwards. Besides, is to be paid attention to
the correct position of the inside hook! Do before absolutely a
sketch.
In this case the feather had a rest length of approx.
1,5 meters, this was sufficient for a functional test of the repaired
engine.
The time involved for the "Patch" of the feather
amounted approx. to one hour. Inserting a new spring is the same
way to do. (left figure) Be careful while opening a new spring !
Fix the spring slightly in a vice. Then open the vice slow, loosen
the secure wire a little bit. Press the spring into the vice, remove
the wire upward. Open the vice careful to loose the spring complete.
The vice should be a span of 150 mm, when full opened. |
In the next section I describe the repair of " Columbia Nr.50 " of
engine
|
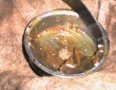
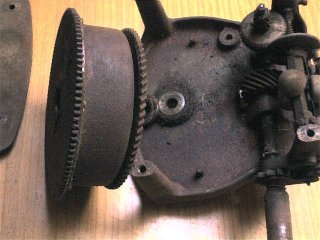
This
engine was in a really pitiful condition, see left picture. I had
found him in my infancy on the rubbish - at that time he did not
look much better! The storage in the corner of a shed more than
30 years also did not carry his(its) condition. Because the engine
is an English make, I had to pay attention awkwardly to save every
screw. With Rostlöser overnight soaked and every separate screws
fly before up to the reason cleaned, I succeeded all screws without
additional damage in getting out. While disassembling one should
pay attention to the position and arrangement of various discs and
feathers - outline or take photos. It is really advisable to disassemble
everything to be able to clean, really, every warehouse and thread
in order to derust I have applied almost only a wire brush - only
the exterior of the spring assembly and the base plate of the engine
had to be cleaned because of the deeply penetrated rust with fine
sandpaper. Old persons Fettreste can be cleaned in the best with
brakes cleaner (in the vehicle-accessory availably), possible rust
in warehouse places with very fine sandpaper removed. Should in
no case be tried to mince any waves before the completed cleaning
by force to loosen them(her). It can be that between the tooth flanks
foreign bodies are which can damage the transmission durably. It
is better to hit the waves and gearwheels with a fitting thorn from
the stockages - if one approaches these. Also Rostlöser works(has
an effect) here miracle. Ticking sounds at the entreprise(operation)
of the engine point to damaged teeth. Most gearwheels can be adjusted
by the height by shims, so that one has the possibility to guarantee
an undisturbed intervention. With this engine an arched outbreak
in the worm gear of the turntable wave was to be done in this way
harmless. |
On the
left about restoring:
Gramophone-amateur handicraftsman - many offers to the procurement of spare parts, beautifully opened
The radiomuseum Bocket from Hans Stellmacher some interesting Tipps has here
The book: gramophones and Phonographen
of Ch. Proudfoot ISBN 3-7667-0562-8 is an indispensable helper also and first
of all to questions of the repair and restoration.
back to records
english
start page